Adobe Illustrator is an incredibly powerful program, and is one of the main tools I use in my designs and my illustrations. But, with such a powerful program, there is also a learning curve. Even after years of using Adobe Illustrator I’m still learning new things every day, and while some of these things are small, some of them are life changing, and I can’t wait to share them with you! Whether it’s an exciting way to improve my design process or a fix for a simple annoyance, I do a little happy dance every time I discover something new.
How to Change Colours with One Easy Click Using Global Colours
In Adobe Illustrator, global colours make it easier to change colours that are already in use. We all know that once you design something, adjusting the colours can be a pain, especially if the design is complex. If you use regular colours and decide you want to replace one of them, you have to select every single element of that colour to do so.
Instead, if you use global colours, all you have to do is change that colour in the swatches panel and any element using that colour automatically changes too. This might seem like a small thing, but can save valuable time when you are working with colours every day. It’s even more impactful for surface pattern designers, because changing a global colour also effects elements in patterns, so you can change the colour without having to click into the pattern. (yay!).
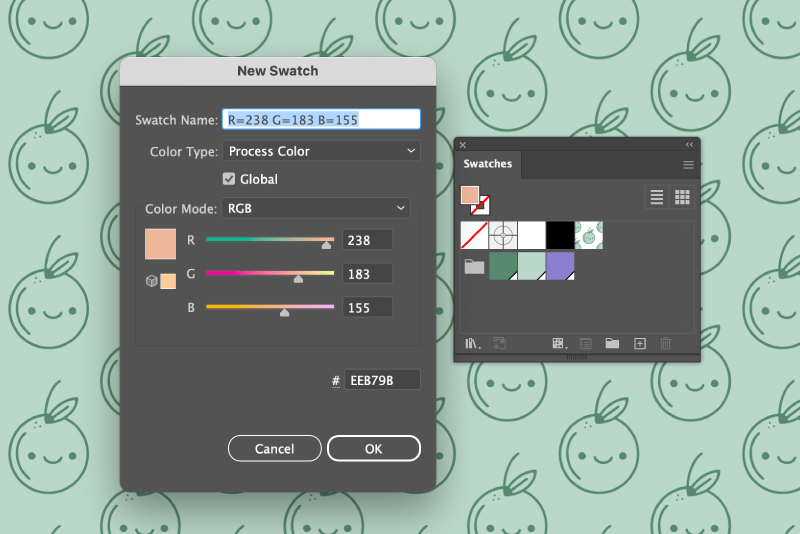
To create a global colour, all you have to do is select an element that is the colour you want, and click the plus sign in the swatches panel. When the options box pops up, select Global Colour, and voila! You can tell the colour is a global colour because it has a white triangle in the bottom right corner of the swatch in the swatches panel. Now when you want to change the colour later, you just go back to that swatch and adjust it, and every element using that colour will change too.
How to Fix Images that Export With an Extra Pixel
Okay, this is a weird one, but it’s also something that can be really annoying if you don’t know how to fix it.
In Adobe Illustrator, if your artboard is not positioned at a whole pixel, sometimes that can make the exported file the wrong size. Let me explain.
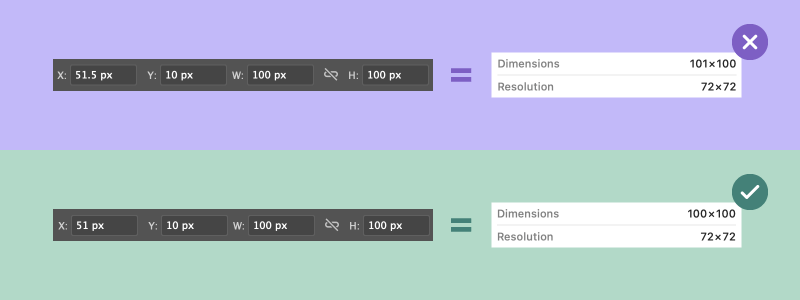
When you are adjusting an artboard in Adobe Illustrator, the x and y values at the top of the screen determine where on the canvas the artboard sits. As you move the artboard around or rearrange several artboards, these numbers change. If your artboard is positioned at a value like 51.5px instead of 51, it is not positioned on a whole pixel. So, when you export your file, Adobe tries to fill in that partial pixel space, and can add an additional pixel to your export.
This means that if your artboard is 100px x 100px within Adobe Illustrator, it could end up being 101px x 100px when you export it.
Well, the fix is simple. All you have to do is go into the artboard tool and make sure the x and y values at the top of the screen are whole numbers. Once you do this and export your file again, it should be the exact size you want.
How to Get Rid of That Annoying Little Grid Thing
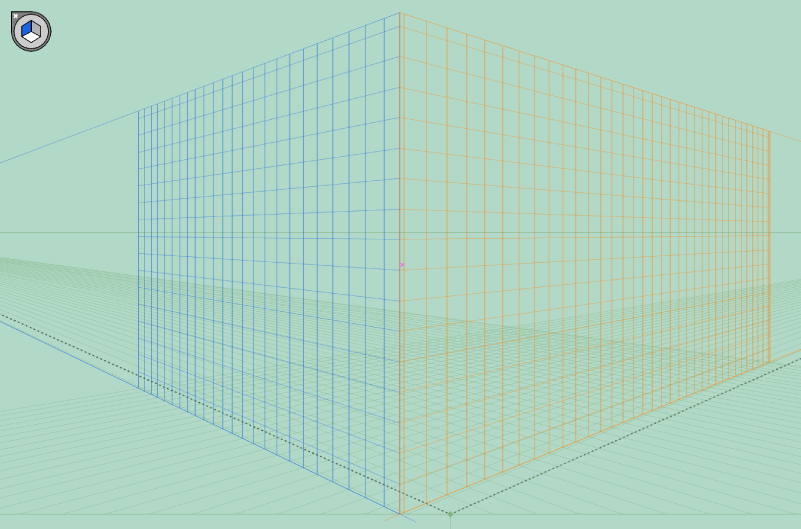
If you’ve worked in Adobe Illustrator for any amount of time, you’ve probably seen this weird little grid thing pop up unexpectedly on the screen when you hit a button by accident. And you’ve probably had no idea how to make it go away. I know this has happened to me more times than I’d like to count. Well, it turns out the fix is pretty simple, even though it might not seem that way when you’re clicking everywhere and nothing is changing.
This is just the perspective grid tool, which I’m sure is useful for making some perspective type things, though I’ve never used it. It shows up because there is a default shortcut that turns it on, and you probably pressed it by accident. So to turn it off, just press that shortcut again (Command + Shift + I), or click View > Perspective Grid > Hide Grid.
If you want to take it a step further and banish this grid from ever coming back accidentally, you can click Edit > Keyboard Shortcuts and remove the shortcut or assign it to something else.
How to Colour in Shapes Easily Using a Live Paint 'Paint Bucket'
In Adobe Illustrator, once you create and outline the paths of a shape, there are a few different ways to colour in that shape, but none of the obvious ones are simple.
I hate to admit that I was using one of the more difficult methods for way too long. I only recently discovered that the Live Paint tool gives you the ability to colour in shapes with one easy click, much like using the paint bucket tool in Photoshop or the early Microsoft Paint.
To learn how to use the Live Paint tool, read through step 6 of my blog post on How to Vectorize Procreate Illustrations.
That’s all for now! I hope these tips are as life changing for you as they were for me. I’ll continue adding new things as I learn them, or remember them, so make sure to check back in or subscribe to my newsletter below to stay up to date.